Here're some resources for this part:

package org.anddev.andengine.examples;import org.anddev.andengine.engine.Engine;import org.anddev.andengine.engine.camera.Camera;import org.anddev.andengine.engine.options.EngineOptions;import org.anddev.andengine.engine.options.EngineOptions.ScreenOrientation;import org.anddev.andengine.engine.options.resolutionpolicy.RatioResolutionPolicy;
Open the AndroidManifest.xml and append the activity element (in red color) below the previous activity element (in light color) like this:import org.anddev.andengine.entity.scene.Scene;import org.anddev.andengine.entity.scene.background.AutoParallaxBackground;import org.anddev.andengine.entity.scene.background.ParallaxBackground.ParallaxEntity;import org.anddev.andengine.entity.sprite.AnimatedSprite;import org.anddev.andengine.entity.sprite.Sprite;import org.anddev.andengine.entity.util.FPSLogger;import org.anddev.andengine.opengl.texture.TextureOptions;import org.anddev.andengine.opengl.texture.atlas.bitmap.BitmapTextureAtlas;import org.anddev.andengine.opengl.texture.atlas.bitmap.BitmapTextureAtlasTextureRegionFactory;import org.anddev.andengine.opengl.texture.region.TextureRegion;import org.anddev.andengine.opengl.texture.region.TiledTextureRegion;/*** (c) 2010 Nicolas Gramlich* (c) 2011 Zynga** @author Nicolas Gramlich* @since 19:58:39 - 19.07.2010*/public class AutoParallaxBackgroundExample extends BaseExample {// ===========================================================// Constants// ===========================================================private static final int CAMERA_WIDTH = 720;private static final int CAMERA_HEIGHT = 480;// ===========================================================// Fields// ===========================================================private Camera mCamera;private BitmapTextureAtlas mBitmapTextureAtlas;private TiledTextureRegion mPlayerTextureRegion;private TiledTextureRegion mEnemyTextureRegion;private BitmapTextureAtlas mAutoParallaxBackgroundTexture;private TextureRegion mParallaxLayerBack;private TextureRegion mParallaxLayerMid;private TextureRegion mParallaxLayerFront;// ===========================================================// Constructors// ===========================================================// ===========================================================// Getter & Setter// ===========================================================// ===========================================================// Methods for/from SuperClass/Interfaces// ===========================================================@Overridepublic Engine onLoadEngine() {this.mCamera = new Camera(0, 0, CAMERA_WIDTH, CAMERA_HEIGHT);return new Engine(new EngineOptions(true, ScreenOrientation.LANDSCAPE, new RatioResolutionPolicy(CAMERA_WIDTH, CAMERA_HEIGHT), this.mCamera));}@Overridepublic void onLoadResources() {BitmapTextureAtlasTextureRegionFactory.setAssetBasePath("gfx/");this.mBitmapTextureAtlas = new BitmapTextureAtlas(256, 128, TextureOptions.BILINEAR_PREMULTIPLYALPHA);this.mPlayerTextureRegion = BitmapTextureAtlasTextureRegionFactory.createTiledFromAsset(this.mBitmapTextureAtlas, this, "player.png", 0, 0, 3, 4);this.mEnemyTextureRegion = BitmapTextureAtlasTextureRegionFactory.createTiledFromAsset(this.mBitmapTextureAtlas, this, "enemy.png", 73, 0, 3, 4);this.mAutoParallaxBackgroundTexture = new BitmapTextureAtlas(1024, 1024, TextureOptions.DEFAULT);this.mParallaxLayerFront = BitmapTextureAtlasTextureRegionFactory.createFromAsset(this.mAutoParallaxBackgroundTexture, this, "parallax_background_layer_front.png", 0, 0);this.mParallaxLayerBack = BitmapTextureAtlasTextureRegionFactory.createFromAsset(this.mAutoParallaxBackgroundTexture, this, "parallax_background_layer_back.png", 0, 188);this.mParallaxLayerMid = BitmapTextureAtlasTextureRegionFactory.createFromAsset(this.mAutoParallaxBackgroundTexture, this, "parallax_background_layer_mid.png", 0, 669);this.mEngine.getTextureManager().loadTextures(this.mBitmapTextureAtlas, this.mAutoParallaxBackgroundTexture);}@Overridepublic Scene onLoadScene() {this.mEngine.registerUpdateHandler(new FPSLogger());final Scene scene = new Scene();final AutoParallaxBackground autoParallaxBackground = new AutoParallaxBackground(0, 0, 0, 5);autoParallaxBackground.attachParallaxEntity(new ParallaxEntity(0.0f, new Sprite(0, CAMERA_HEIGHT - this.mParallaxLayerBack.getHeight(), this.mParallaxLayerBack)));autoParallaxBackground.attachParallaxEntity(new ParallaxEntity(-5.0f, new Sprite(0, 80, this.mParallaxLayerMid)));autoParallaxBackground.attachParallaxEntity(new ParallaxEntity(-10.0f, new Sprite(0, CAMERA_HEIGHT - this.mParallaxLayerFront.getHeight(), this.mParallaxLayerFront)));scene.setBackground(autoParallaxBackground);/* Calculate the coordinates for the face, so its centered on the camera. */final int playerX = (CAMERA_WIDTH - this.mPlayerTextureRegion.getTileWidth()) / 2;final int playerY = CAMERA_HEIGHT - this.mPlayerTextureRegion.getTileHeight() - 5;/* Create two sprits and add it to the scene. */final AnimatedSprite player = new AnimatedSprite(playerX, playerY, this.mPlayerTextureRegion);player.setScaleCenterY(this.mPlayerTextureRegion.getTileHeight());player.setScale(2);player.animate(new long[]{200, 200, 200}, 3, 5, true);final AnimatedSprite enemy = new AnimatedSprite(playerX - 80, playerY, this.mEnemyTextureRegion);enemy.setScaleCenterY(this.mEnemyTextureRegion.getTileHeight());enemy.setScale(2);enemy.animate(new long[]{200, 200, 200}, 3, 5, true);scene.attachChild(player);scene.attachChild(enemy);return scene;}@Overridepublic void onLoadComplete() {}// ===========================================================// Methods// ===========================================================// ===========================================================// Inner and Anonymous Classes// ===========================================================}
<activityandroid:name=".AugmentedRealityHorizonExample"android:label="@string/app_name" ><intent-filter><action android:name="org.anddev.andengine.examples.AUGMENTEDREALITYHORIZONEXAMPLE" /><category android:name="android.intent.category.DEFAULT" /></intent-filter></activity><activityandroid:name=".AutoParallaxBackgroundExample"android:label="@string/app_name" ><intent-filter><action android:name="org.anddev.andengine.examples.AUTOPARALLAXBACKGROUNDEXAMPLE" /><category android:name="android.intent.category.DEFAULT" /></intent-filter></activity>
Run the project (in debug mode) to re-generate apk file in the bin folder
Open and Edit the batch command file named r.bat in the bin folder with some commands like this:
adb install -r AndEngineDemo.apk
adb shell am start -n org.anddev.andengine.examples/.AutoParallaxBackgroundExample
Run android emulator with virtualbox
Then run the batch file r.bat
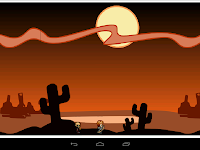
The result's like this with animated pictures


Two characters walk on the background movement effect


0 comments:
Post a Comment